The Pencil Case | A garden design + landscape graphics newsletter ‌ ‌ ‌ ‌ ‌ ‌ ‌ ‌ ‌ ‌ ‌ ‌ ‌ ‌ ‌ ‌ ‌ ‌ ‌ ‌ ‌ ‌ ‌ ‌ ‌ ‌ ‌ ‌ ‌ ‌ ‌ ‌ ‌ ‌ ‌ ‌ ‌ ‌ ‌ ‌ ‌ ‌ ‌ ‌ ‌ ‌ ‌ ‌ ‌ ‌ ‌ ‌ ‌ ‌ ‌ ‌ ‌ ‌ ‌ ‌ ‌ ‌ ‌ ‌ ‌ ‌ ‌ ‌ ‌ ‌ ‌ ‌ ‌ ‌ ‌ ‌ ‌ ‌ ‌ ‌ ‌ ‌ ‌ ‌ ‌ ‌ ‌ ‌ ‌ ‌ ‌ ‌ ‌ ‌ ‌ ‌ ‌ ‌ ‌ ‌ ‌ ‌ ‌ ‌ ‌ ‌ ‌ ‌ ‌ ‌ ‌ ‌ ‌ ‌ ‌ ‌ ‌ ‌ ‌ ‌ ‌ ‌ ‌ ‌ ‌ ‌ ‌ ‌ ‌ ‌ ‌ ‌ ‌ ‌ ‌ ‌ ‌ ‌ ‌ ‌ ‌ ‌ ‌ ‌ ‌ ‌ ‌ ‌ ‌ ‌ ‌ ‌ ‌ ‌ ‌ ‌ ‌ ‌ ‌ ‌ ‌ ‌ ‌ ‌ ‌ ‌ ‌ ‌ ‌ ‌ ‌ ‌ ‌ ‌ ‌ ‌ ‌ ‌ ‌ ‌ ‌ ‌ ‌ ‌ ‌ ‌ ‌ ‌ ‌ ‌ ‌ ‌ ‌ ‌ ‌ ‌ ‌ ‌ ‌ ‌ ‌ ‌ ‌ ‌ ‌ ‌ ‌ ‌ ‌ ‌ ‌ ‌ ‌ ‌ ‌ ‌ ‌ ‌ ‌ ‌ ‌ ‌ ‌ ‌ ‌ ‌ ‌ ‌ ‌ ‌ ‌ ‌ ‌ ‌ ‌ ‌ ‌ ‌ ‌ ‌ ‌ ‌ ‌ ‌ ‌ ‌ ‌ ‌ ‌ ‌ ‌ ‌ ‌ ‌ ‌ ‌ ‌ ‌ ‌ ‌ ‌ ‌ ‌ ‌ ‌ ‌ ‌ ‌ ‌ ‌ ‌ ‌ ‌ ‌ ‌ ‌ ‌ ‌ ‌ ‌ ‌ ‌ ‌ ‌ ‌ ‌ ‌ ‌ ‌ ‌ ‌ ‌ ‌ ‌ ‌ ‌ ‌ ‌ ‌ ‌ ‌ ‌ ‌ ‌ ‌ ‌ ‌ ‌ ‌ ‌ ‌ ‌
View in Web Browser

Hello Lisa. 

I asked one of my Garden Design Collective members a question recently. I wanted to know if she'd learned anything in our sessions that she hadn't gotten anywhere else...not even in her formal landscape design coursework.

She didn't hesitate. Lines of force, she said. The one thing her class never covered. She called it "super helpful and important."

That's exactly what I want to walk through with you today.

Extend Lines from the House

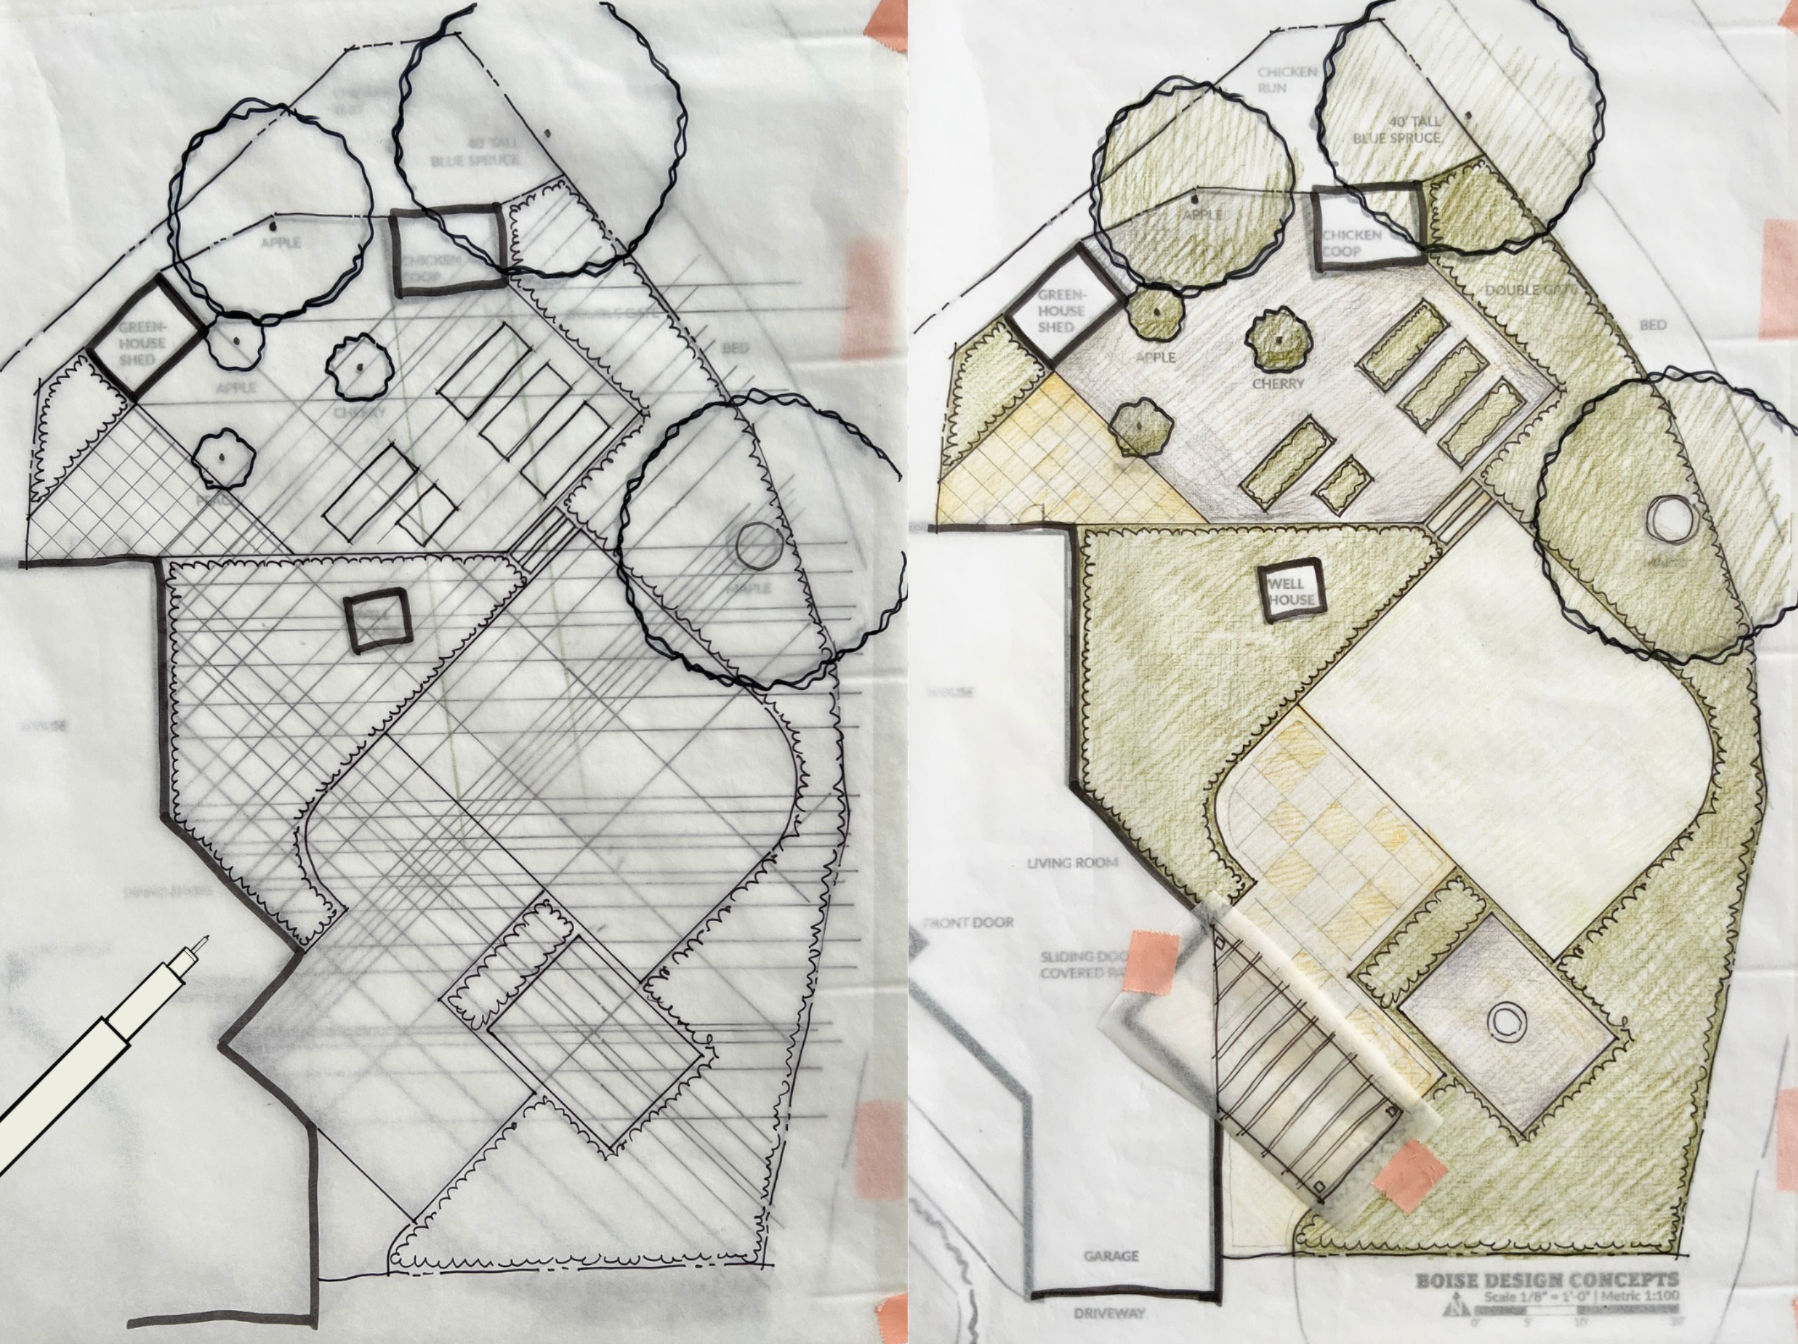
Here's the idea: your house is already providing the start of a design grid. You just have to extend it.

⚘

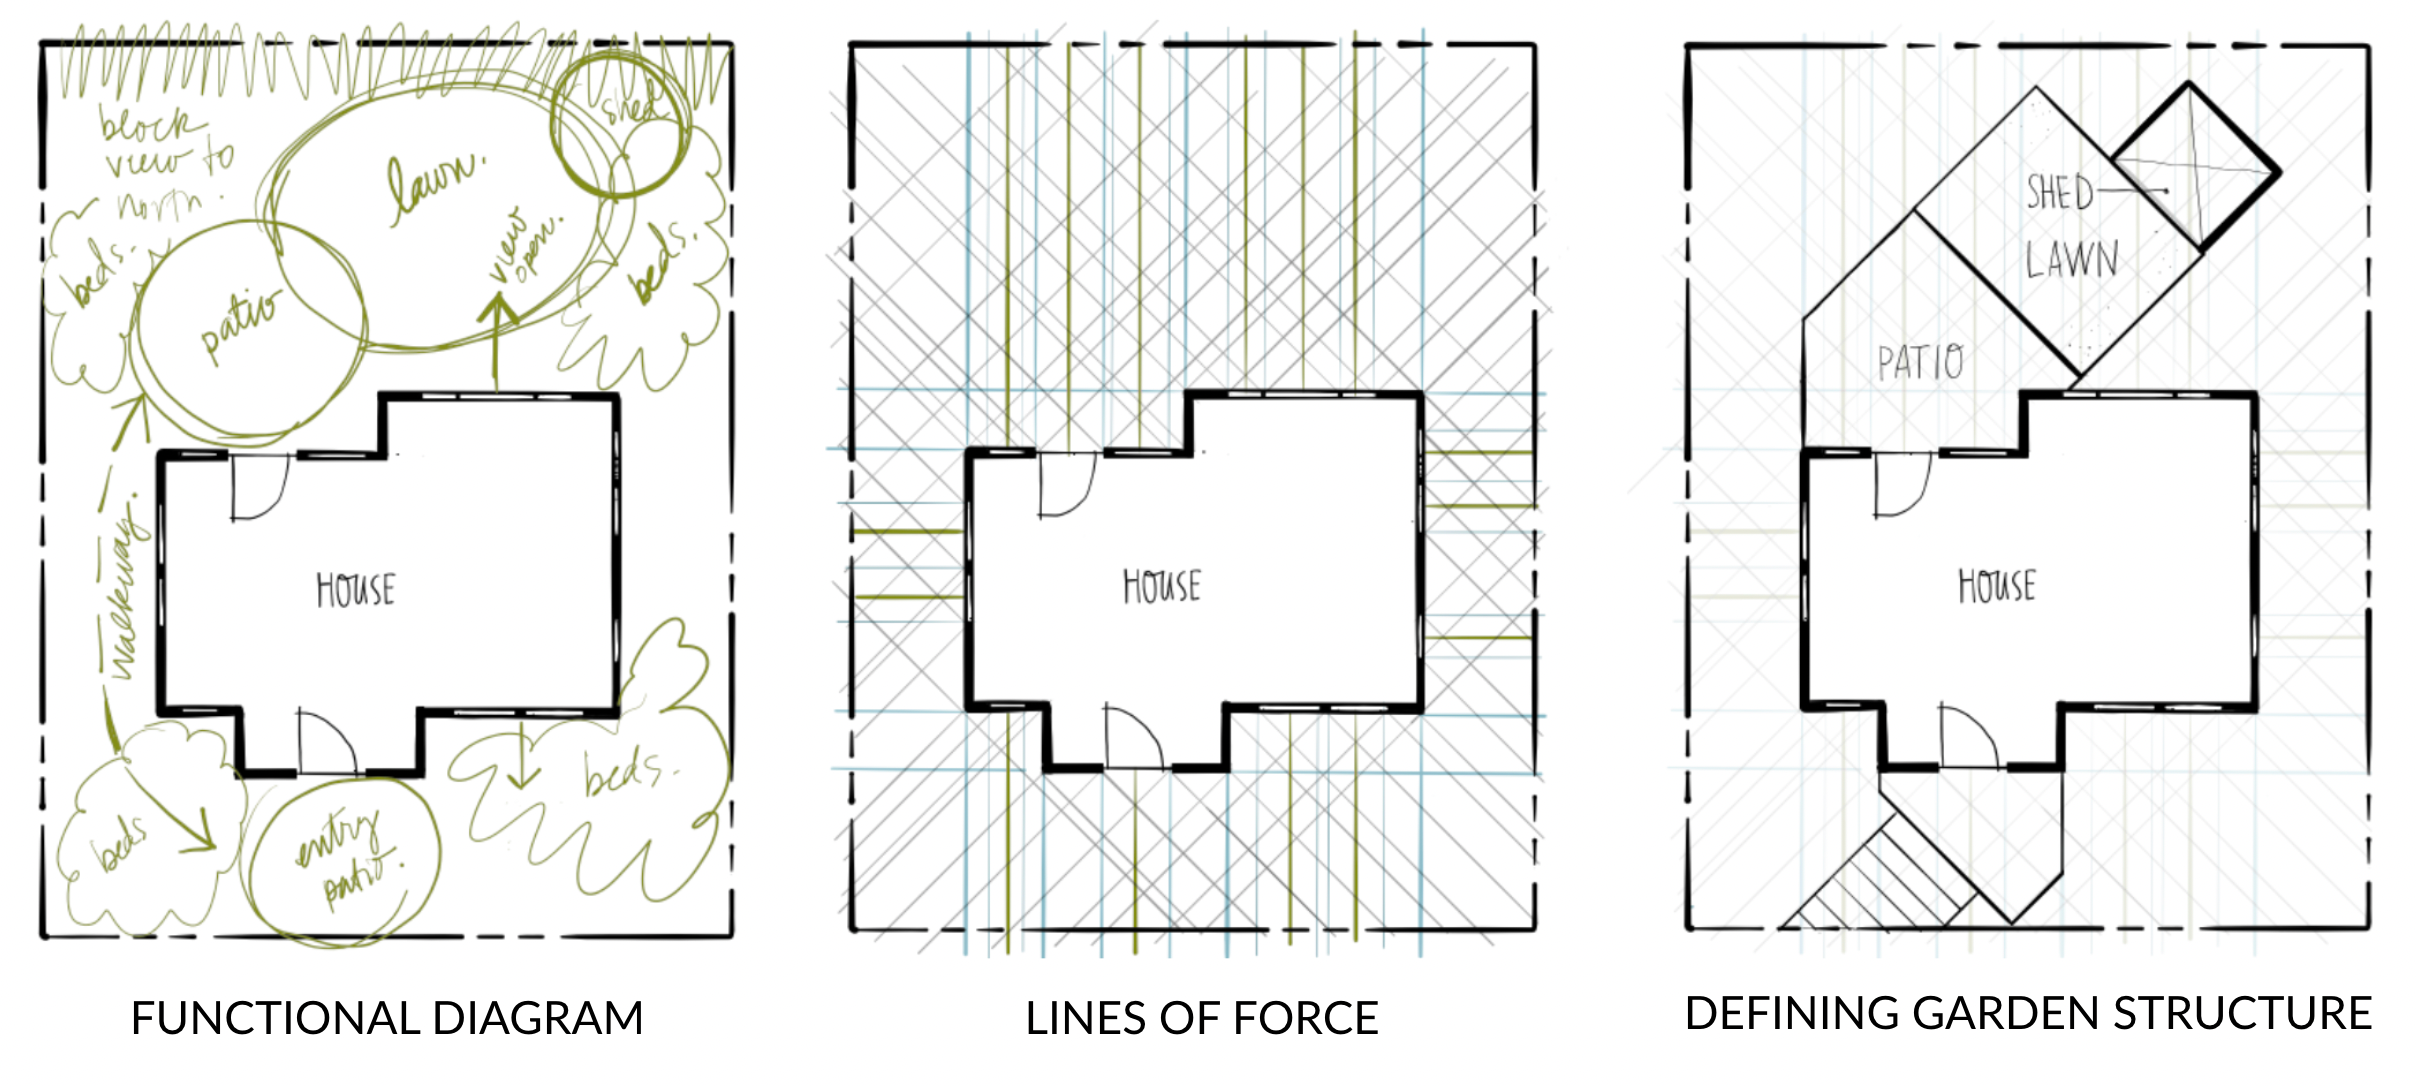
Take the edges of your house, your garage, any structure that's staying put. Extend those lines out into the yard. Add in your window and door lines, your best view lines, anything else on the house that feels worth carrying forward. Suddenly, what used to feel like open, undefined space has structure running through it...before you've placed a single plant or paver.

⚘

That's lines of force. It's not a new idea...it goes back to Le Corbusier, who called it the "necessity of order." But it's one of the most useful tools I know for taking a garden from "things scattered around the yard" to "a space that feels intentional."

Why Order Matters

That grid is what starts to define your garden rooms. Your patios, your lawn, your beds, your paths...the actual spaces, before any of the plants are chosen.

This is the part that's easy to skip. It's tempting to jump straight to plants, because plants are the fun part. But if you place plants before you've defined the rooms they'll live in and around, you end up with what I call "garden confetti"...pretty things scattered around, but no real sense of space. Define the rooms, then create the beds...and finally, start tucking in those fabulous plants.

⚘

A few things worth knowing before you try it:

Draw your grid at 90 degrees first, straight off the house. You can also add a 45-degree layer for more options.

Work through the spaces you'll live in (patios, lawn areas, laundry yard, etc), then create your beds. If you start with the beds, your garden rooms tend to come out an odd shape. Design the room. Then let the beds enclose it.

Keep it simple. The best designs are the simplest ones. You can always add complexity later in the plantings.

If you'd like to see this in action, I walked through the whole process, grid and all, in How to Unify Your Landscape on the blog. There's a short video too, if you'd rather watch than read.

⚘ 

If you'd like to share this with a friend who's working through the same thing, they're welcome to subscribe right here. And if you ever want to dig through past issues, I keep them all tucked away in the VAULT. ♥︎

⚘ 

The right structure doesn't box you in...it's what lets everything else fall into place.

From the studio + garden,
Lisa

.....

P.S. If you want to go deeper on tools like this...the ones that give your designs real structure...please join the Garden Design Collective waitlist. I'll let you know the moment enrollment reopens next month.

⚘ 

PAPER GARDEN WORKSHOP

Instagram Pinterest

Huge thanks to Mandy Orgler for bringing these graphics to life, issue after issue.

Unsubscribe | Sent by Paper Garden Workshop LLC
900 Keosauqua Way, 213 • Des Moines, IA • 50309